Howdy - The name is Bandit.
Bandit is the sourdough starter behind every loaf at Wild Bandit Bakery. What he lacks in fancy designs, he makes up for in the kind of slow-fermented gut-healthy goodness made with organic ingredients that you can feel good about feeding to your family. He is the sort of man who knows the weight of early mornings and long days. His life has been shaped by the land that doesn’t give easy answers, and work that doesn’t leave much room for ego. He’s rugged, weather-tested, and tougher than an old cedar post - but there is a goodness under his grit that’s clear for anyone to see.
Over the years, sourdough has become something more than just a hobby for him, but a necessity. He wanted to feed the people he cared for and every loaf of bread baked at Wild Bandit Bakery is a reflection of himself: strong, reliable and shaped through patience and perseverance.
He stands on his values - independent but deeply connected to his community; strong but servant-hearted. He brings the backbone to this story of nourishment built on faith, family and the kind of freedom you earn through an honest day’s work.
Bandit’s story before the bakery…

As told by Bandit himself…
Before settling down with Jason & Erica at Bold Rebalance Farm, I traveled all across these magnificent United States in the back of a yellow scamp camper (lovingly nicknamed Bandit) with my good buddy Dave; feeding countless families along the way before landing in the beautiful state of Idaho where I’ve decided to grow some roots.
Before I arrived in Idaho, Erica had been eating a strictly gluten free diet after years of health struggles and she was finally ready to give gluten another chance but wanted to do it responsibly - with something organic and long-fermented; my specialty. Together, Dave and I poured a lot of love into that first loaf and praise God, she loved it! Not only did she love the way it tasted but she felt great afterwards and from then on, the rest is history…
So, as is tradition, Dave shared a piece of me with Erica who decided to pass on the namesake of Dave’s yellow scamp camper and bestowed upon me the name “Bandit”. I’ve been by her side baking up all the good breads and baked treats on their farm ever since.
What began as a passion project has since evolved into something much greater. We believe that the slow work matters. The unseen hours matter. And when you’re faithful with what’s in front of you, God brings the increase in His time.
These loaves are more than just bread - they’re provision, purpose and proof that honest work still feeds people well. So follow along on Instagram and Facebook as we grow this small-town microbakery from scratch
Lasting impact
Everything we do is based on the belief that Faith comes first, Family comes next and the Freedom to bake this good bread has a way of pulling both of those things just a little closer. When we keep these values of Faith, Family and Freedom at the center and let God handle the rest; the rest has a way of working itself out for good.

Bringing Bandit back to life…
How to rehydrate Bandit - your freeze-dried sourdough starter:
WHAT YOU’LL NEED…
- Water
- Clean quart size mason jars
- Mason jar lids or cloth coverings
- Wooden or silicone spatula
- Food Scale
IMPORTANT: If you’re working with tap water from the city, you may want to consider using a filtered water source to avoid any amount of chlorine which may have the potential to damage or kill your sourdough starter. Well water should be fine but you can always test your water with an affordable as-home test kit to be sure. Don’t over think it too much, just avoid the chorine as best as you can.
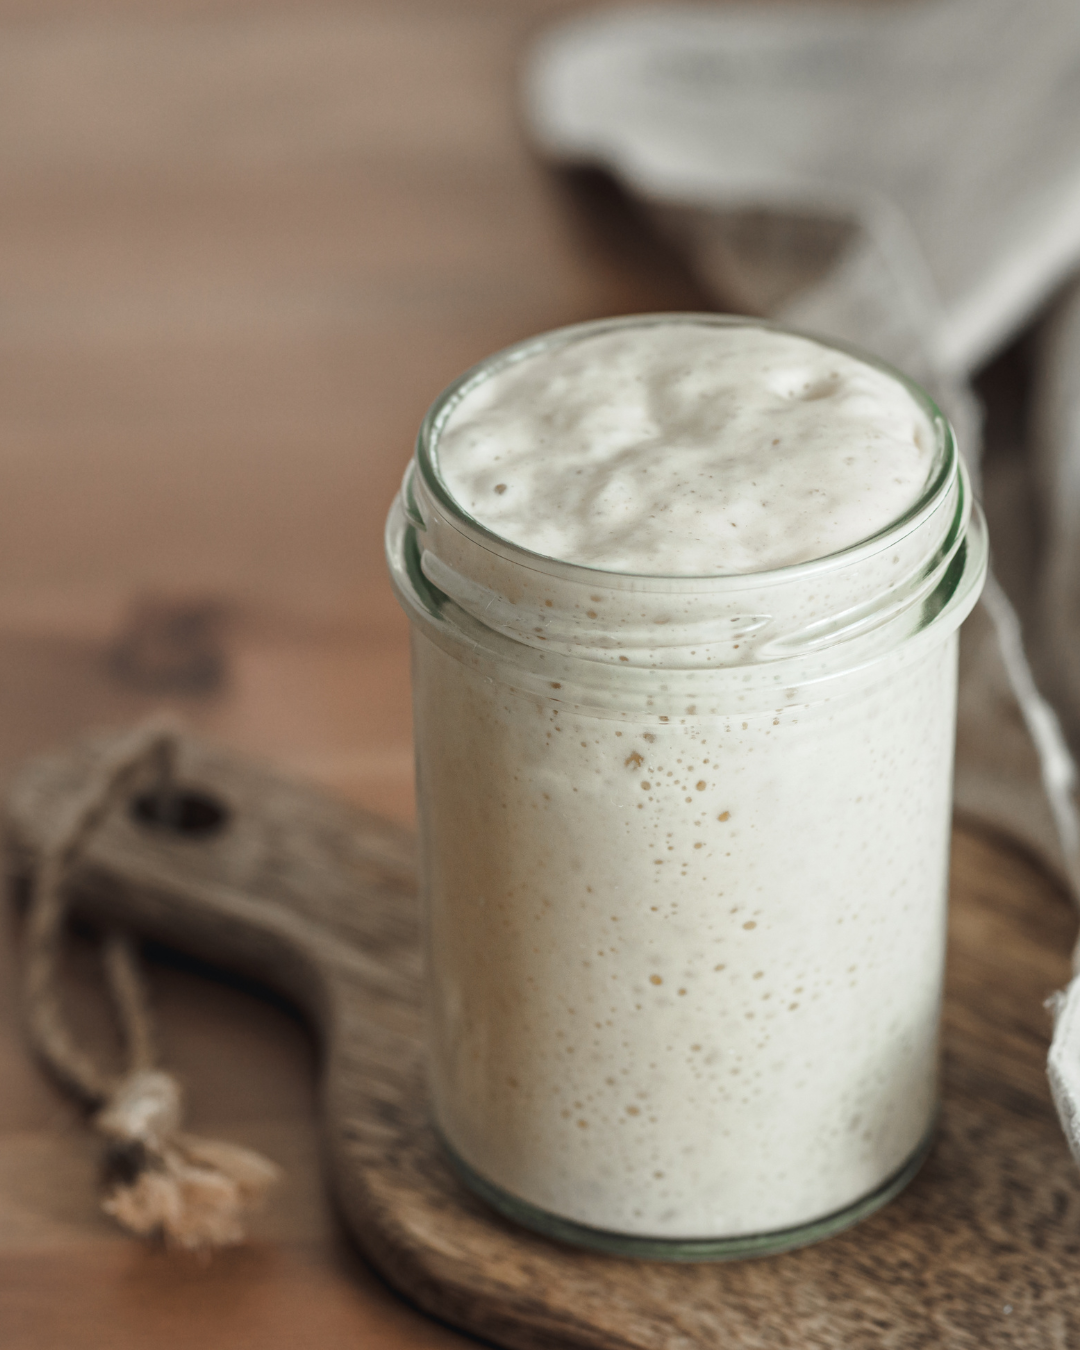
DAY ONE - MORNING
Place the total contents of your Bandit sourdough starter packet into a clean glass quart jar. Add 50 grams of a lukewarm well or filtered water to the jar and mix well. Let the starter soak in the water to rehydrate a while (30-60 minutes should do the trick) before adding in 25 grams of an organic All Purpose or bread flour mix well to fully combine and scrape down the sides of the glass. There should not be any dry bits when you’re done. Cover with a wet cloth or a loose fitting lid and store at room temperature for 24 hours. Be sure to NOT secure your lid tightly so that gasses can escape without causing any damage to your jar.
DAY 2 - MORNING
Baby Bandit might look smooth, with little to no bubbles at all. He might smell tangy and look sluggish; that’s perfectly fine as he’s not quite fully alive yet. If you notice that any water and flour mixture has separated, don’t fret! This is normal. Separate 20 grams of this mixture into a new clean mason jar and add 20 grams of water + 20 grams of flour. This is called a 1:1:1 feeding. Cover again and let sit at room temperature for another 24 hours.
* The left over mixture in the first jar is what’s known as discard. I NEVER throw this away! You can fry it up into a flatbread, make crackers or even sweet treats like brownies and cookies that call for discard in the recipe. Bottom line - don’t toss it.
DAYS 3 THROUGH 5 - MORNING
You might not notice much activity besides a few bubbles on the surface. If you do notice more bubbles and any rise, you can add a bit more flour if you’re feeling adventurous. Otherwise, stick with the 1:1:1 feed ratio. Again, start with 20 grams of the mixture and add 20 grams water and 20 grams flour. Mix to combine, scrape down the sides and let sit for 24 hours. Repeat on days 3 through 5.
At some point, you should notice that Bandit will start to smell pleasantly sweet/tangy/yeasty and has a rise with a domed peak before he starts to fall again and visible bubbles all throughout the sides of the jar. This is what we’re aiming for!
Once you notice this, start feeding using a 1:2:2 ratio. For example: 20 grams starter + 40 grams water + 40 grams flour. You can use your starter when all that’s left is residue in the jar; scrape it down, feed it and watch it grow.
Once your starter is active and healthy, you can add almost any ratio of flour + water to your starter so long as the starting starter amount is LESS than your feed ratios. You don’t want to give a starter a combined water + flour total that is less than your starter weight; this will yield you a weak and sluggish starter that won’t perform well.
OPTIONAL STRENGTH TEST
Combine 10 grams starter + 50 grams water + 50 grams flour (1:5:5). It should still double in a reasonable time if it’s truly active and strong.
CONGRADULATIONS!
You’re ready to bake with your new starter when he doubles (or more) within the first 4-8 hours after a feed. The ideal time to use your starter for a recipe is when he reaches his peak, just before falling again.
SUGGESTED DAILY FEED
30 grams starter + 100 grams water + 125 grams flour.
STORING
Feed daily if storing on the counter - don’t do this if you don’t plan to bake with him; this is a sure fire way to burn yourself out and waste a lot of flour. When you’re not going to use him for a while, give him a feed and store in the fridge for up to 2 weeks. Feed him and put back in the fridge for another 2 weeks if you don’t need him. Otherwise, calculate the amount of starter you’ll need in your upcoming back, feed him accordingly and leave on the counter to rise for your next use.
COMMON PROBLEMS
If you notice that Baby Bandit is bubbly but not rising after you’ve completed all 5 days, double check your scale and measurements and try again. If you’re still having issues, it could be because of one of the following…
Water - you may unknowingly be using chlorinated water. Test it or get filtered water and try again.
Temperature - Bandit likes it warm. Aim for a room temp of 74-80 degrees F. Since most of us don’t keep our homes that warm, choose the warmest place in your home to store him between feeds.
Too much flour - Don’t jump to big feeds before he’s ready. Be sure to wait for active bubbles and rise.
Switching to whole grain too early - While it’s true that you can feed your starter any type of flour in the long run, he’s going to struggle if you make the switch too early. AP or bread flour works best for a starter that’s just waking up; only switch when active. Don’t rush the process.
Here is an easy sourdough bread recipe for a first-timer. Simple and straight-forward.
1 loaf | ~70% hydration | No Mixer | No Bench Scraper | Overnight Rest | Dutch Oven Bake
Ingredients:
100 grams active bubbly sourdough starter (Bandit)
375 grams lukewarm non-chlorinated water
500 grams all-purpose flour
10 grams of good quality salt
Step-By-Step Instructions:
1. In a large bowl combine starter and water. Mix until fully combined. This ensures even distribution of starter throughout the flour.
2. Add flour and salt. With a spoon, spatula or your hands, mix to combine until all the dry flour is incorporated. The dough will be shaggy and sticky - this is normal. Scrape the sides of the bowl down to combine.
3. Cover and let rest for 30 minutes.
4. Stretch-and-fold by grabbing one side of the dough, pulling it up and folding it over. Give the bowl a 1/4 turn and repeat until you’ve folded all 4 sides in. Let sit and repeat 4 times every 15 minutes (roughly). Cover with a wet cloth and let sit at room temp between stretch-and-folds.
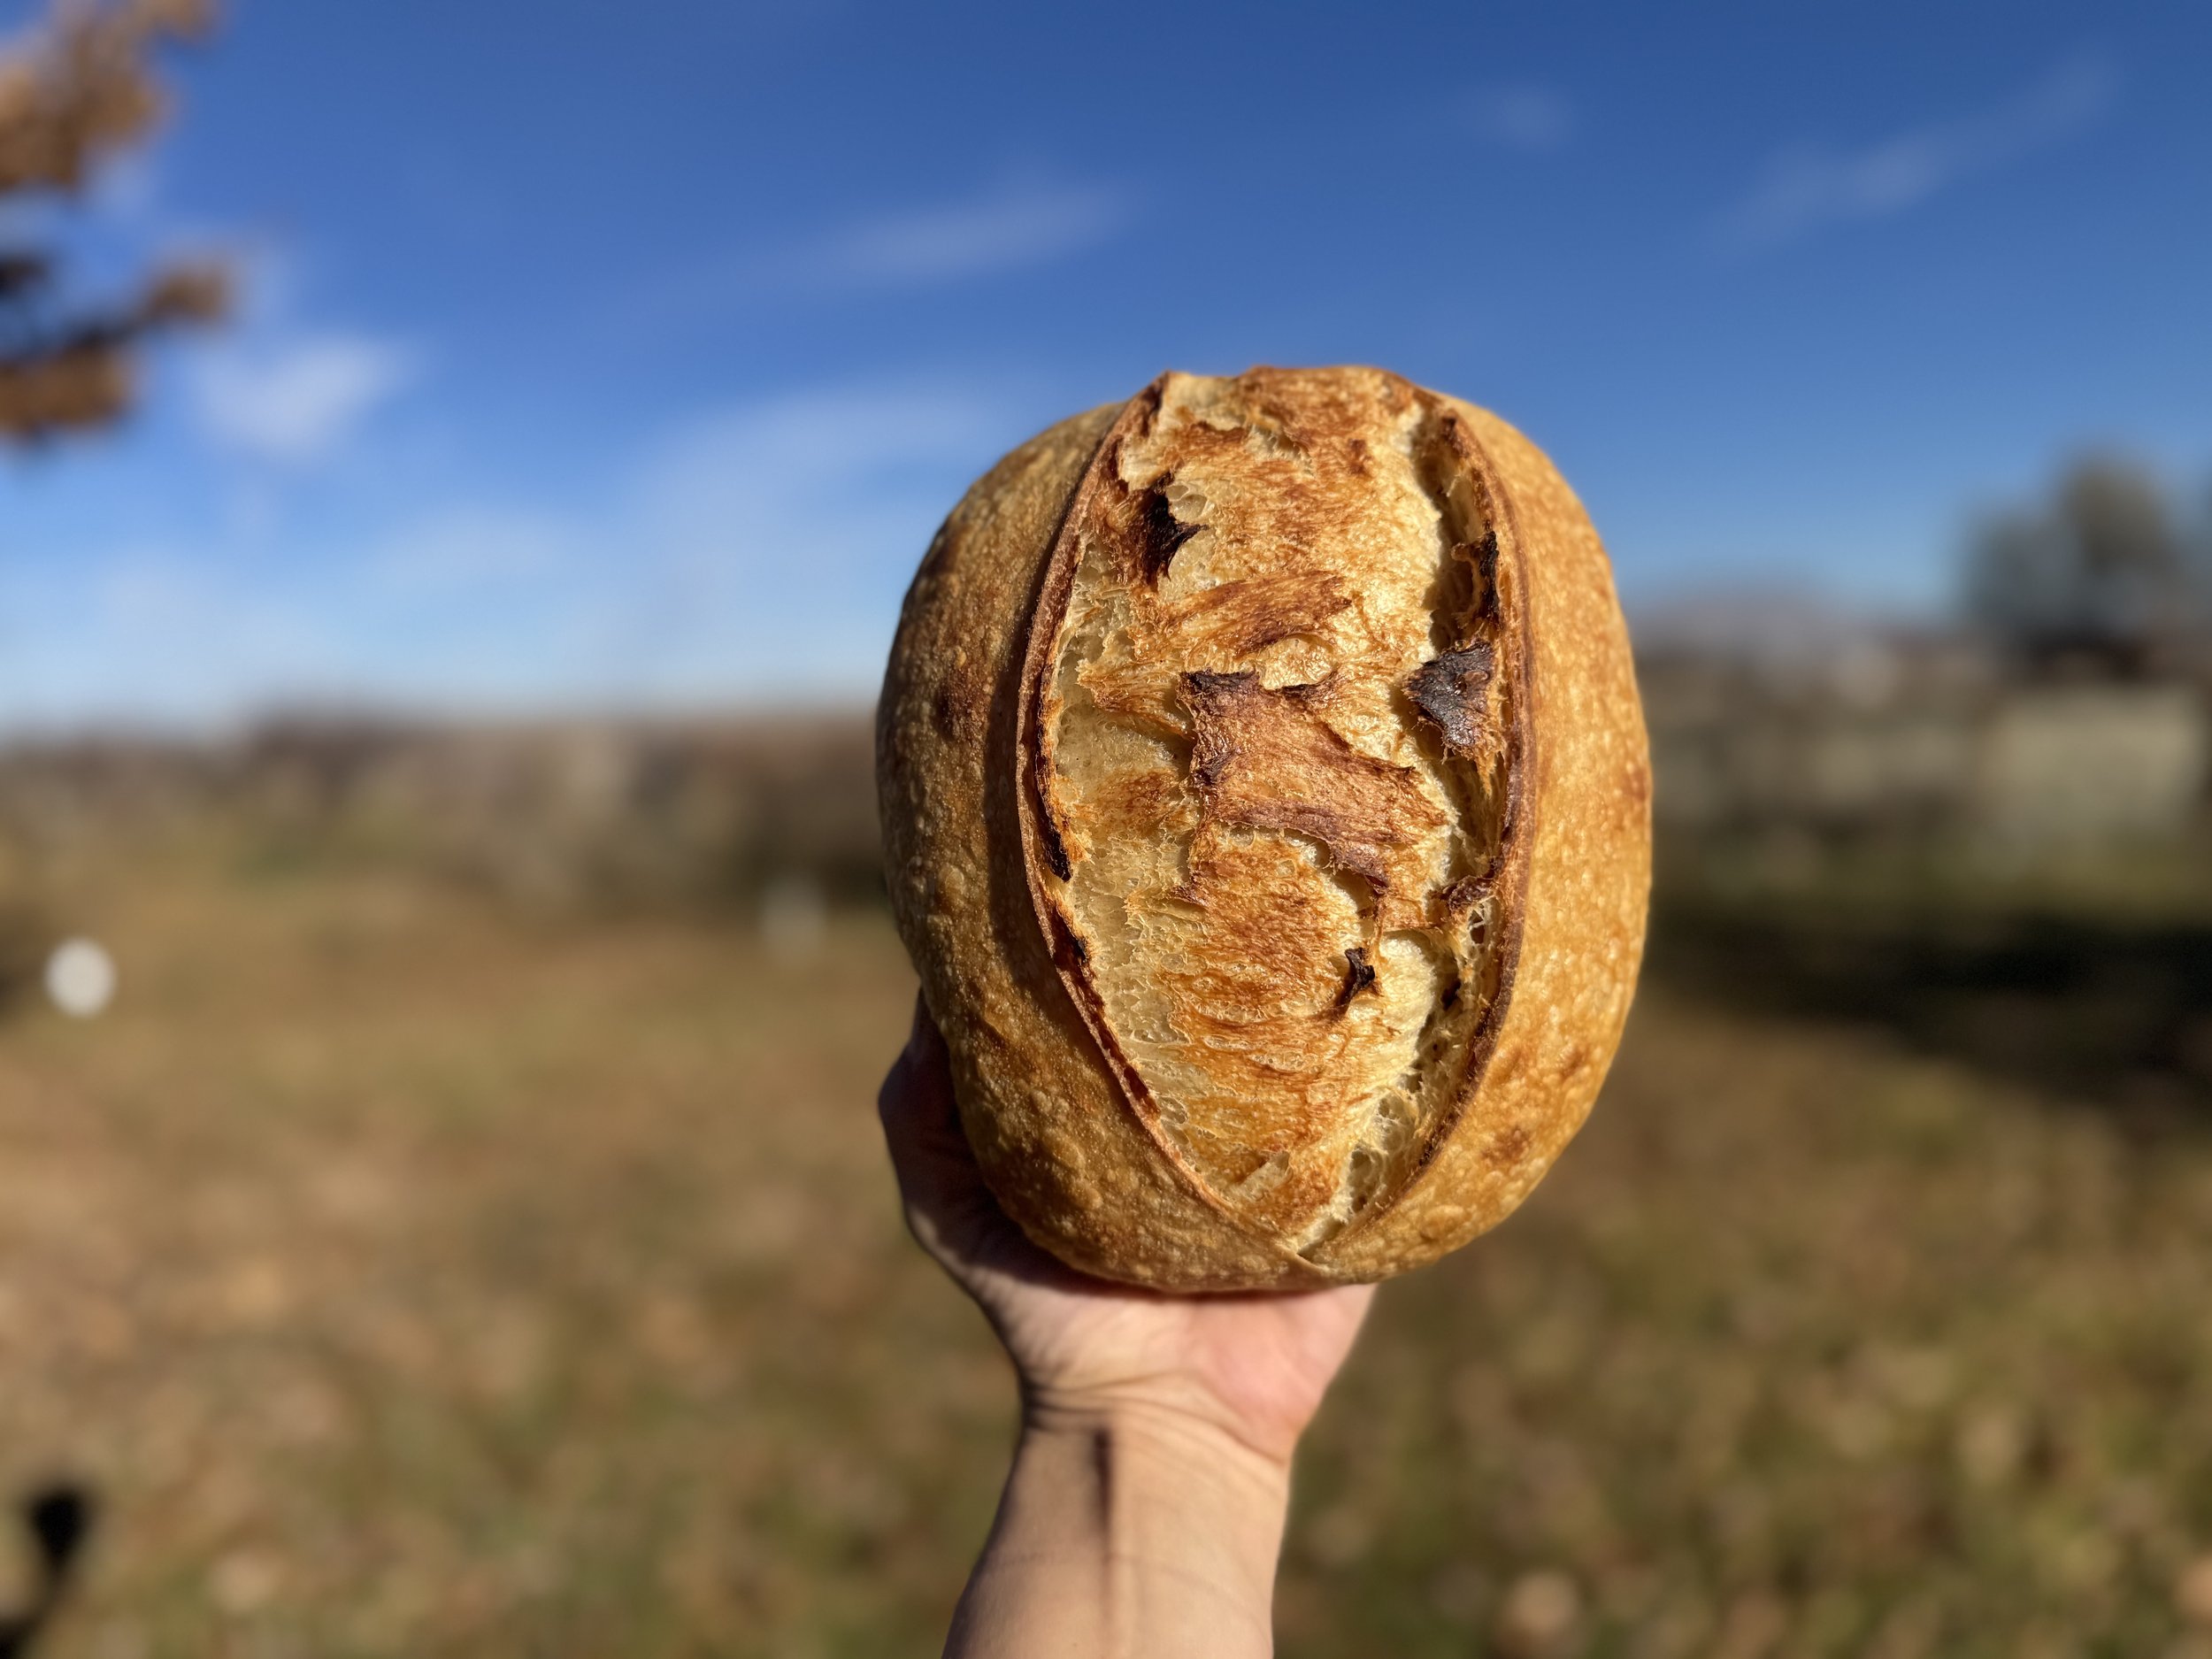
5. After you’ve completed 4 stretch-and-folds, cover with a wet cloth and let rest for anywhere from 3-12 hours. You’re looking for the dough to rise about 50-75%. The dough should be jiggly and have bubbles forming just under the surface and along the sides; which is visible if you’re using a glass bowl.
6. Gently turn your flour out onto a smooth or lightly floured surface. Fold the edges toward the center to form a circular(ish) shape. Flip it over, seam-side down and gently tighten by pulling toward you. Repeat a few times to create some surface tension on the top. Perfection is NOT needed - don’t stress about this step.
7. Place dough seam-side up in a banneton or lightly floured bowl (can use a small amount of olive oil to coat the bowl, if preferred). Cover and refrigerate for at least 8 hours or up to 48 hours if needed.
8. On bake day - Preheat the oven at 450 degrees F with a dutch oven inside. Allow to preheat for at least 30 minutes.
9. Remove the dough from the refrigerator, place seam side down on a sheet of parchment paper. Score it using a sharp knife, about 1/4” deep - long ways in any direction will do.
10. Plop the parchment paper and dough into the already hot dutch oven (don’t burn yourself!).
11. Put the lid on and bake for 30 minutes. At the end of the 30 minutes, remove the lid and bake for another 10-15 minutes until the top has reached your desired level of golden brown or longer if you prefer burnt edges.
12. Remove from the dutch oven and let cool for at least 1 hour before slicing to avoid a gummy texture
WHAT DOES SUCCESS LOOK LIKE?
- Crunchy Crust
- Soft, slightly chewy crumb (inside bread)
- Mild sourdough tangy flavor
- Irregular holes that are not too big and not too dense
- NOT gummy
COMMON BEGINNER FIXES
Too flat - Starter wasn’t active enough, was too watery or the dough was allowed to over-proof or ferment for too long.
Gummy Inside - Needs more time baking with the lid on or more time to cool down before cutting
Too Sour - In my opinion, there is NO SUCH THING! But if that’s not your thing, just shorten the fridge time next round.
SHARE YOUR SUCCESS!
PLEASE share your success on social media and be sure to tag @WildBanditBakery so we can all give you the Hip Hip Hooray you deserve!
Your First Bake…
Simple ideas
Good bread begins with good ingredients. We prioritize organic, as local as possible and transparency when sourcing our flour, salt, olive oil and other ingredients. While any ole flour might yield bread, they won’t all be gut healthy. So, we choose responsibly